Deploying Your First Application on Kubernetes: Step-by-Step Tutorial
What is Kubernetes?
Maximizing Efficiency with Kubernetes Deployment for Applications
Prerequisites for Kubernetes Deployment
What are Containers?
There are two primary ways to create and manage resources:
Mastering Kubernetes Deployment
In this tutorial, we'll delve into the intricacies of Kubernetes Development and guide you through each step of launching your first application! Whether you're a seasoned developer or a newbie, Kubernetes is a potential tool for managing workload and container services.
What is Kubernetes?
Kubernetes is an orchestration platform that automates the deployment, scaling, and management of containerized applications. It helps developers to concentrate on innovating and creating valuable products.
Maximizing Efficiency with Kubernetes Deployment for Applications
You might be wondering, “Why should I bother deploying my application on Kubernetes?” For instance, you build an amazing app, and it's gaining resistance faster than you can say “Stability.”
Suddenly, when your server crashes because of the incoming request. With Kubernetes, you can effortlessly scale your applications to handle the increase of loads without breaking a sweat.
Kubernetes Deployment empowers developers to streamline the deployment process, allowing them to focus on innovating and product creation. If one of your applications goes down, Kubernetes will automatically spin up a new one. It facilitates communication between development and operations teams and assists in better managing the application infrastructure.
Not only that, Kubernetes even helps to reduce the costs of managing and maintaining deployments by allowing you to focus on what really matters and building awesome software.
In this tutorial will show the process of deploying your first application on Kubernetes step by step. We'll start by setting up your Kubernetes environment and guiding you through the installation and Configuration Steps. Don't worry if you are new to Kubernetes; we will take it slow and steady. Follow these steps for deployments!
Prerequisites for Kubernetes Deployment
STEP 1: Installing of Kubernetes on master and work nodes:
-------------------------------------- Both Master & Worker Node ---------------------------------------sudo suapt update -yapt install docker.io -ysystemctl start dockersystemctl enable dockercurl -fsSL "https://packages.cloud.google.com/apt/doc/apt-key.gpg" | sudo gpg --dearmor -o /etc/apt/trusted.gpg.d/kubernetes-archive-keyring.gpgecho 'deb https://packages.cloud.google.com/apt kubernetes-xenial main' > /etc/apt/sources.list.d/kubernetes.listapt update -yapt install kubeadm=1.20.0-00 kubectl=1.20.0-00 kubelet=1.20.0-00 -y# To connect with cluster execute above commands on master node and worker node respectively--------------------------------------------- Master Node --------------------------------------------------sudo sukubeadm init# To start using your cluster, you need to run the following as a regular user:mkdir -p $HOME/.kubesudo cp -i /etc/kubernetes/admin.conf $HOME/.kube/configsudo chown $(id -u):$(id -g) $HOME/.kube/config# Alternatively, if you are the root user, you can run:export KUBECONFIG=/etc/kubernetes/admin.confkubectl apply -f https://github.com/weaveworks/weave/releases/download/v2.8.1/weave-daemonset-k8s.yamlkubeadm token create --print-join-command------------------------------------------- Worker Node ------------------------------------------------sudo sukubeadm reset pre-flight checks-----> Paste the Join command on worker node and append `--v=5` at end#To verify cluster connection---------------------------------------on Master Node-----------------------------------------kubectl get nodes# worker# kubeadm join 172.31.84.66:6443 --token n4tfb4.grmew1s1unug0get --discovery-token-ca-cert-hash sha256:c3fda2eaf5960bed4320d8175dc6a73b1556795b1b7f5aadc07642ed85c51069 --v=5# kubeadm reset pre-flight checks# kubeadm token create --print-join-command# kubectl label node ip-172-31-20-246 node-role.kubernetes.io/worker=worker# kubectl label nodes ip-172-31-92-99 kubernetes.io/role=worker# kubectl config set-context $(kubectl config current-context) --namespace=dev
STEP 2: Clone a repository
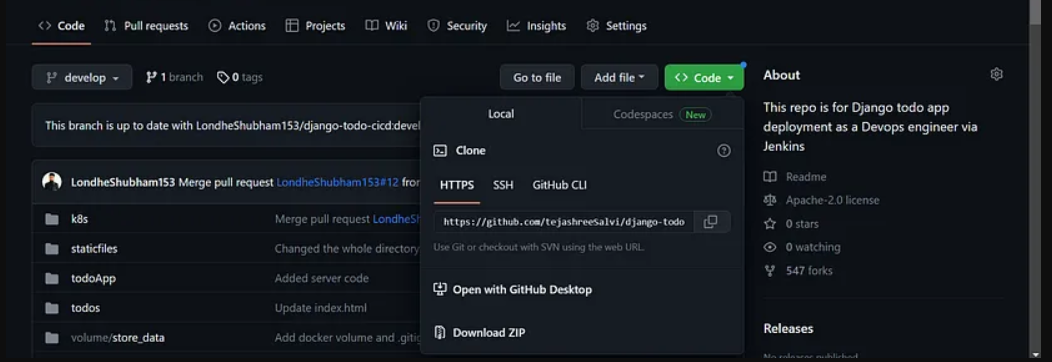
Let's look into the Docker file in this repository
FROM python:3WORKDIR /dataRUN pip install django==3.2COPY . .RUN python manage.py migrateEXPOSE 8000CMD ["python","manage.py","runserver","0.0.0.0:8000"]
It’s a Django application running on port number
8000manage.py
What are Containers?
Containers are a type of runtime environment where your application code is packaged and run along with its dependencies. A container cluster is a dynamic system that arranges and controls containers that are operating on nodes in pods, together with all of their connections and channels of communication. It is also managed by Kubernetes Deployment and offers a lightweight and efficient runtime environment for running your applications.
STEP 3: Building an image from Dockfile
docker build . -t trajendra/django-todo:latestGo to the repository cd django-todo and run the above command to create an image.
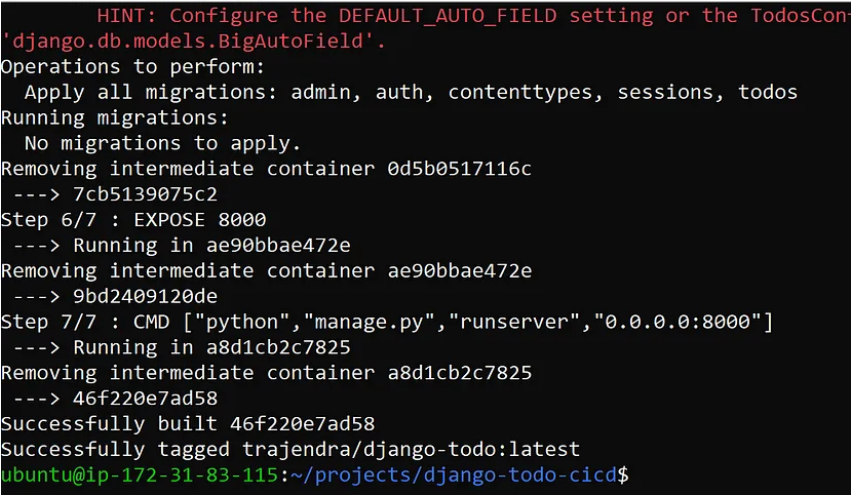
Run the docker images command to get the list of images.

The image is successfully created.
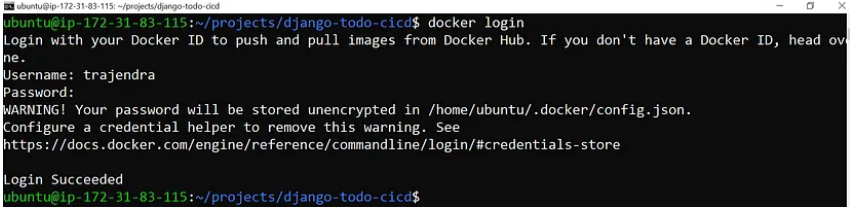
STEP 4: Push the Docker image to a Registry
Login to the Docker hub
docker loginThe command will ask for a username and password after it has been executed. After entering the information, your login has been successful.
Push the image to register
docker push trajendra/django-todo:latest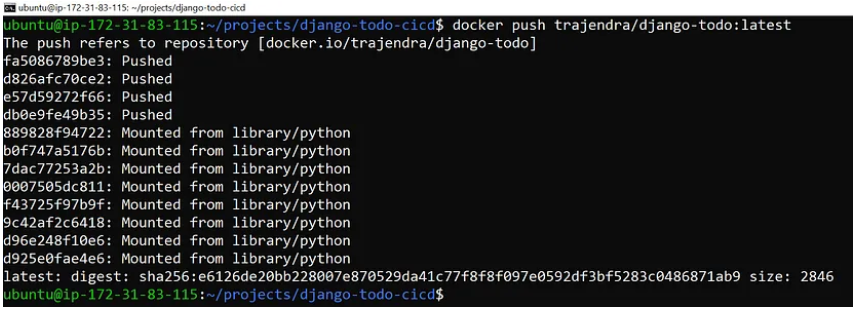
Check to see if the docker image has been successfully pushed to the registry.
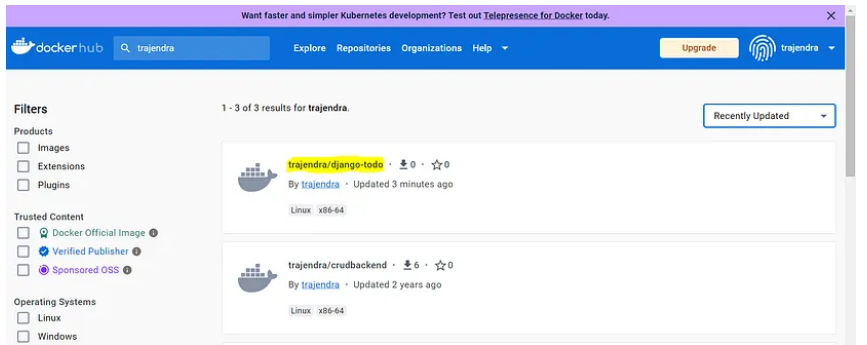
Wow! You've successfully pushed the image to the registry and created it. From this image, we will create containers.
There are two primary ways to create and manage resources:
1. Command-line Interface
2.YAML manifest
1. Command - Line Interface:
Kubernetes provides a command line tool for interacting with the control plane of a Kubernetes cluster via the Kubernetes API.
The Kubernetes CLI referred to as kubectl is a tool that allows you to interact with the Kubernetes Cluster. It offers a set of commands for managing, creating, and adjusting Kubernetes resources.
2. Yaml Manifest
Configuration files written in YAML are called YAML manifests. The ideal states of Pods, Deployments, ConfigMaps, Secret, and many other things are specified in these files.
Let’s start with what a POD is.
The smallest unit of a Kubernetes application is called a pod, which is a grouping of one or more Linux® containers. One or more tightly coupled containers (an advanced use case) or just one container (a more common use case) can make up any given pod. Kubernetes Deployment orchestrates the deployment of pods, ensuring that your application components are efficiently distributed and managed.
To deploy our application, we'll be using YAML Manifests.
TASK 1: create your first Pod
The YAML Manifests will be used to create a single pod.
apiVersion: v1kind: Podmetadata:name: django-appspec:containers:- name: django-appimage: trajendra/django-todo:latestports:- containerPort: 8000
- specifies the Kubernetes API version being used.
apiVersion: v1 - indicates that you are creating a Pod object.
kind: Pod - contains metadata about the Pod, including its name.
metadata - defines the desired state of the Pod.
spec - an array of container objects running inside the Pod. In this case, there is only one container.
containers - sets the name of the container to "crud-backend-app".
name: crud-backend-app - specifies the Docker image to be used for the container. In this case, it uses the image "trajendra/django-todo" with the "latest" tag.
image: trajendra/crudbackend:latest - defines the network ports that the container exposes. In this example, it exposes port 8000.
ports
kubectl apply -f pod.ymlBy using this command, Kubernetes will read our YAML file and make the necessary updates to any cluster resources.
- Connect to Worker Node to verify if the container is successfully created.
docker ps
- Now let's enter the container and run the curl command.
docker exec -it 3551dae bash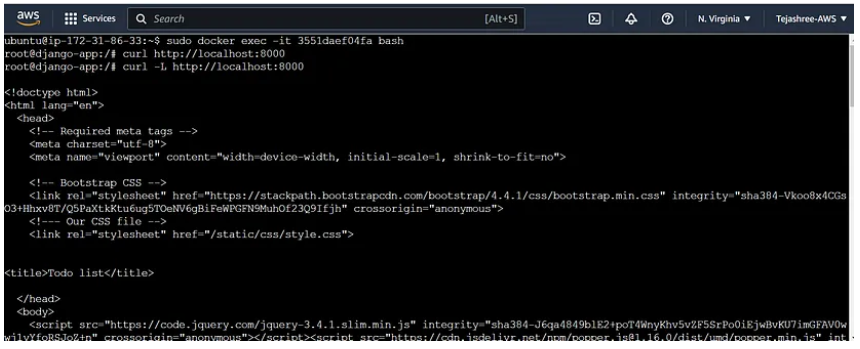
Hello there! With YAML Manifests, we have been able to successfully create containers via pod.
NAMESPACE
When creating a namespace, consider the organizational structure of your deployments, ensuring that Kubernetes Deployment can efficiently manage resources across different environments. Within a cluster, logical groupings called namespaces are formed. They enable the coexistence of several teams or applications in one cluster.
- By default, Kubernetes provides a default namespace where resources are created if no specific namespace is specified
- You can define RBAC (Role-Based Access Control) policies to grant different levels of access to resources based on namespaces.
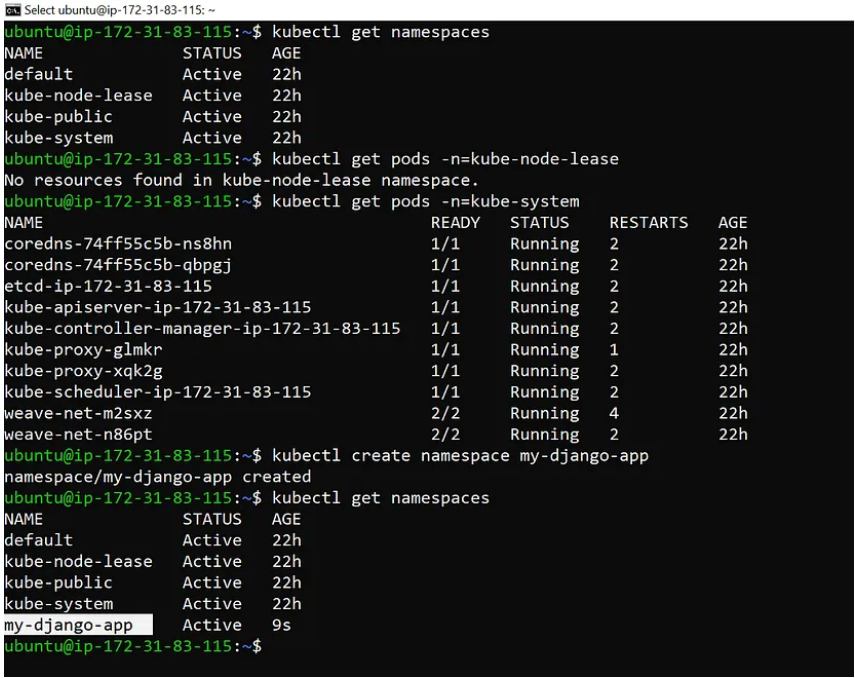
STEP 5: create a namespace
kubectl create namespace my-django-appWe will be creating a namespace for our application to include all the pods, services, deployment, and containers in this namespace.
TASK 2: Create a pod inside the Namespace
apiVersion: v1kind: Podmetadata:name: django-appnamespace: my-django-appspec:containers:- name: django-appimage: trajendra/django-todo:latestports:- containerPort: 8000
- To create the pod run the following command:
kubectl apply -f pod.yml- To verify the pods created inside the namespace
kubectl get pods -n=my-django-app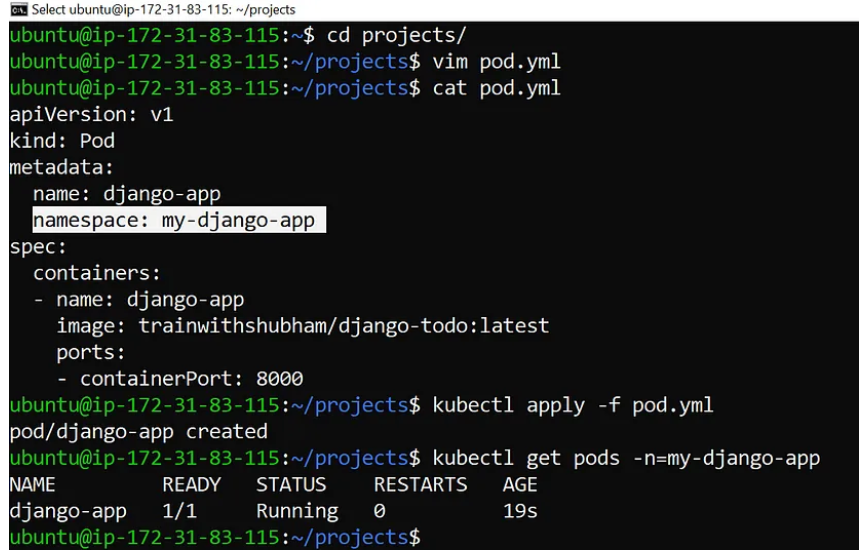
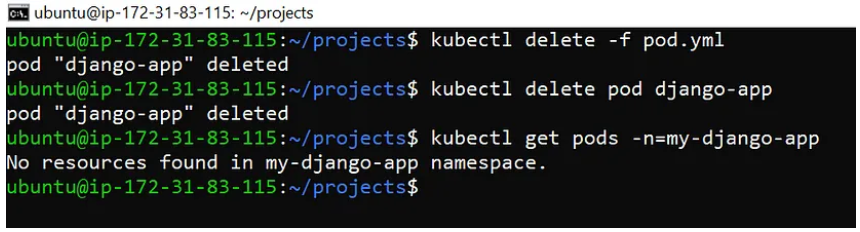
Deleting a POD
kubectl delete -f pod.ymlHere, the pod will be deleted from the namespace
We have added a namespace and added in the metadata.
Deployments
- A well-configured Kubernetes Deployment ensures the smooth operation of your applications, managing updates and scaling seamlessly.
- Kubernetes tracks the health of the Pods under a deployment's management. To keep the required number of replicas, Kubernetes automatically replaces a Pod that malfunctions or stops responding.
STEP 6: Create a Deployment
apiVersion: apps/v1kind: Deploymentmetadata:name: my-django-app-deploymentlabels:app: django-appnamespace: my-django-appspec:replicas: 3selector:matchLabels:app: django-apptemplate:metadata:labels:app: django-appspec:containers:- name: django-app-containerimage: trajendra/django-todo:latestports:- containerPort: 8000
In Manifest above, we have declared deployments and things we need to know.
kind:selector:- Defines the labels that Pods must have to be considered part of the Deployment. In this case, Pods with the label
matchLabels: - Defines the desired number of replicas (Pods) to maintain, set to 3 in this example.
replicas: - Defines the Pod template used to create the Pods managed by the Deployment.
template: - Specifies the specifications for the Pods created from the template.
spec:
kubectl apply -f deployment.yml # run the deployment
kubectl get pods -n=my-django-app # get the list of pods in namespace
You can then use the command to create or update the Deployment in your Kubernetes cluster.
To get the pods created inside a namespace
kubectl get pods -n=my-django-app.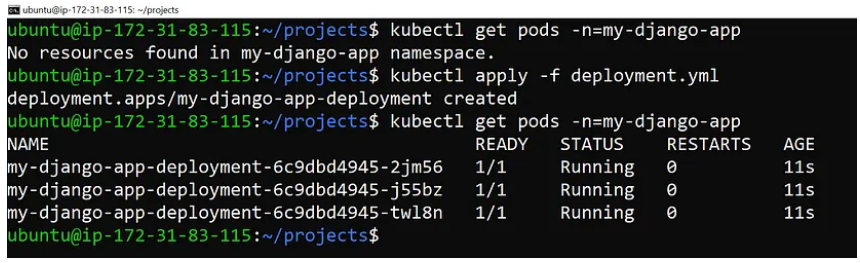
Scale
It is used to scale the number of replicas (pod) in the Deployment.
TASK 3: Create 10 replicas using Kubernetes CLI commands
kubectl scale deployment my-django-app-deployment --replicas=10 -n=my-django-app--replicas=10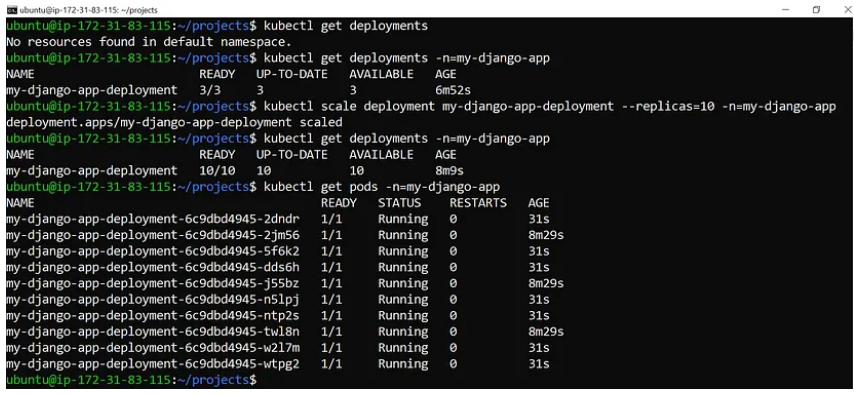
It has create 10 pods in clusters
Service
You are operating a web application in a deployment that has several pods. Every pod possesses a unique IP address that is subject to dynamic changes. As the number of pods increases or decreases, this method becomes infeasible. You can develop a service to address this issue.
STEP 7: EXPOSE your Applications to external users
NodePort: Opens a port on each cluster node's IP address for the Service. permits external users to access the service. We are using the permitted IP range of NodePort (30007–32767).
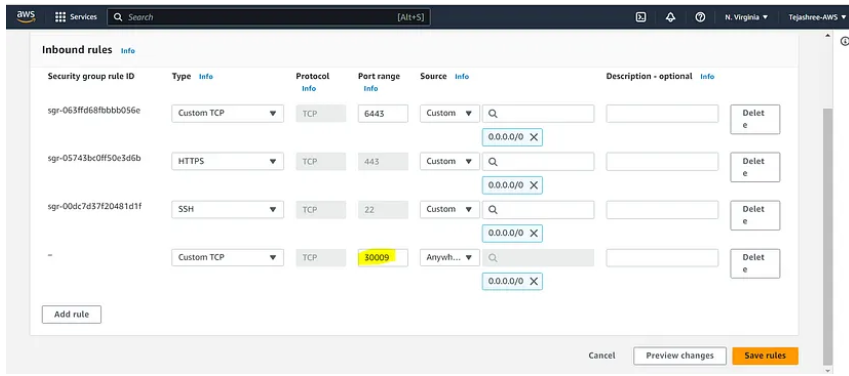
port:targetPortnodePort: 3000930009nodeIP:30009kubectl apply -f service.yml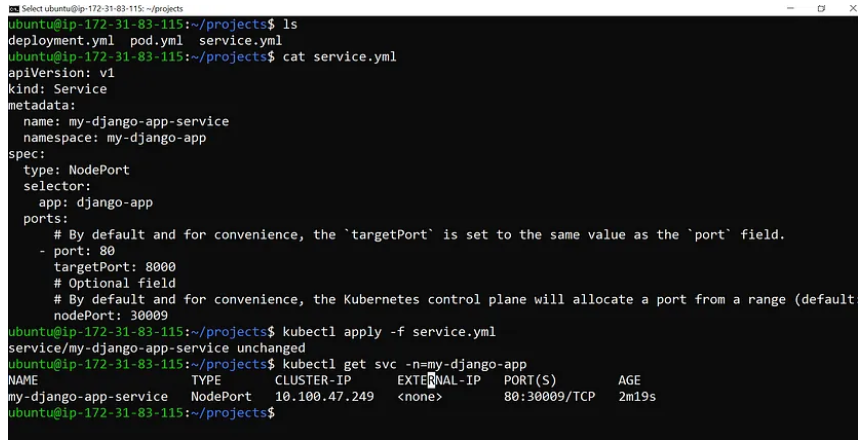
Edit the inbound rule in the security group of the EC2 instance and click on save rules.
Congratulations! We have successfully deployed a todo application on a Kubernetes Cluster.
Mastering Kubernetes Deployment
Congratulations on completing the tutorial on deploying your first application on Kubernetes! We are happy to be part of your journey to becoming a Kubernetes deployment master.
In conclusion, Kubernetes provides a powerful set of tools and strategies for controlling deployment, reducing cost, and improving reliability. By utilizing features such as rollbacks capability, Pods, Deployments, and advanced deployment strategies, we can reduce downtime and ultimately save money on infrastructure and operational expenses.
Moving forward to practical aspects of deploying applications on Kubernetes. By Mastering Kubernetes Deployment technique, you unlock the full potential, achieving unparalleled efficiency and Scalability in your application deployments.
For more Kubernetes Deployment skills, blogs, and resources, check out the other Ambassador blogs.
Try Telepresence Now
Ready to Transform Your Development Journey with Kubernetes?